

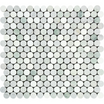


Carrara White Marble Luxury Lantern with Grey Corner Border
Subheading
Heading
Description
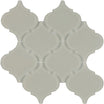
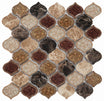
Make a centerpiece out of the Carrara White Marble Luxury Lantern with Grey Corner Border Mosaic tile to capture the eyes of your guests. This elegant and sophisticated Carrara White marble mosaic water jet masterpiece features trim grey borders that form a stunning arabesque design, boasting classic elegance and high-end appeal.
The polished surface enhances the organic patterns of the Carrara marble, while the soft grey border adds definition, refinement, and stunning visual coherence. This mosaic is perfect for use as and is not limited to: shower floors, feature walls, fireplace surrounds, powder rooms, and luxury backsplashes.
-
Pattern: Lantern (Arabesque) with Grey Corner Inset
-
Finish: Polished
-
Material: Natural Carrara White Marble with Grey Marble Accents
-
Ideal For: Shower floors, bathroom walls, backsplashes, fireplace surrounds, accent walls, and entryway features
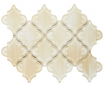
Transform your surfaces into sculptural elegance with the refined silhouette of Carrara marble lanterns framed in soft grey. This tile is ideal for use in designs that require modern and classical touches and thus make it a favorite among bespoke designers who appreciate timeless materials.
Specifications
Installation
MATERIAL INSPECTION
- Inspect goods for defects before installation.
INSTALLATION
- Use white thin-set mortar.
- Grout joint minimum: 1/16”.
Make a centerpiece out of the Carrara White Marble Luxury Lantern with Grey Corner Border Mosaic tile to capture the eyes of your guests. This elegant and sophisticated Carrara White marble mosaic water jet masterpiece features trim grey borders that form a stunning arabesque design, boasting classic elegance and high-end appeal.
The polished surface enhances the organic patterns of the Carrara marble, while the soft grey border adds definition, refinement, and stunning visual coherence. This mosaic is perfect for use as and is not limited to: shower floors, feature walls, fireplace surrounds, powder rooms, and luxury backsplashes.
-
Pattern: Lantern (Arabesque) with Grey Corner Inset
-
Finish: Polished
-
Material: Natural Carrara White Marble with Grey Marble Accents
-
Ideal For: Shower floors, bathroom walls, backsplashes, fireplace surrounds, accent walls, and entryway features
Transform your surfaces into sculptural elegance with the refined silhouette of Carrara marble lanterns framed in soft grey. This tile is ideal for use in designs that require modern and classical touches and thus make it a favorite among bespoke designers who appreciate timeless materials.
MATERIAL INSPECTION
- Inspect goods for defects before installation.
INSTALLATION
- Use white thin-set mortar.
- Grout joint minimum: 1/16”.
FAQ
Use this text to share information about your product or shipping policies.
Can this tile be used for flooring?
Yes! The lantern shape and polished marble surface make this tile a great option for shower floors and light-use residential floors, especially when sealed to maintain traction and durability.